Keyframe animation in the Figma Motion plugin
Keyframe is the basic animation tool. It gives you powerful abilities to make your scene alive. Today, we will learn what the keyframe is and how to use it.

Overview
Keyframe defines layer properties’ changes over time. Every keyframe contains properties like time, value, easing, and so on. With the help of keyframes you can change almost any layer property. It can be X, Width, Stroke Color, Drop Shadow X Offset and so on. It depends on your needs.
The most common usage is moving a layer along the X or Y axes or along the path. Animating along the path is described in this article. Here, we will learn a rectilinear movements.
All examples are available in this this file.
Anchor

Before we start animating, we should learn a very important thing. Every layer has a special point, according to which the layer is moving and rotating. It is an anchor point.

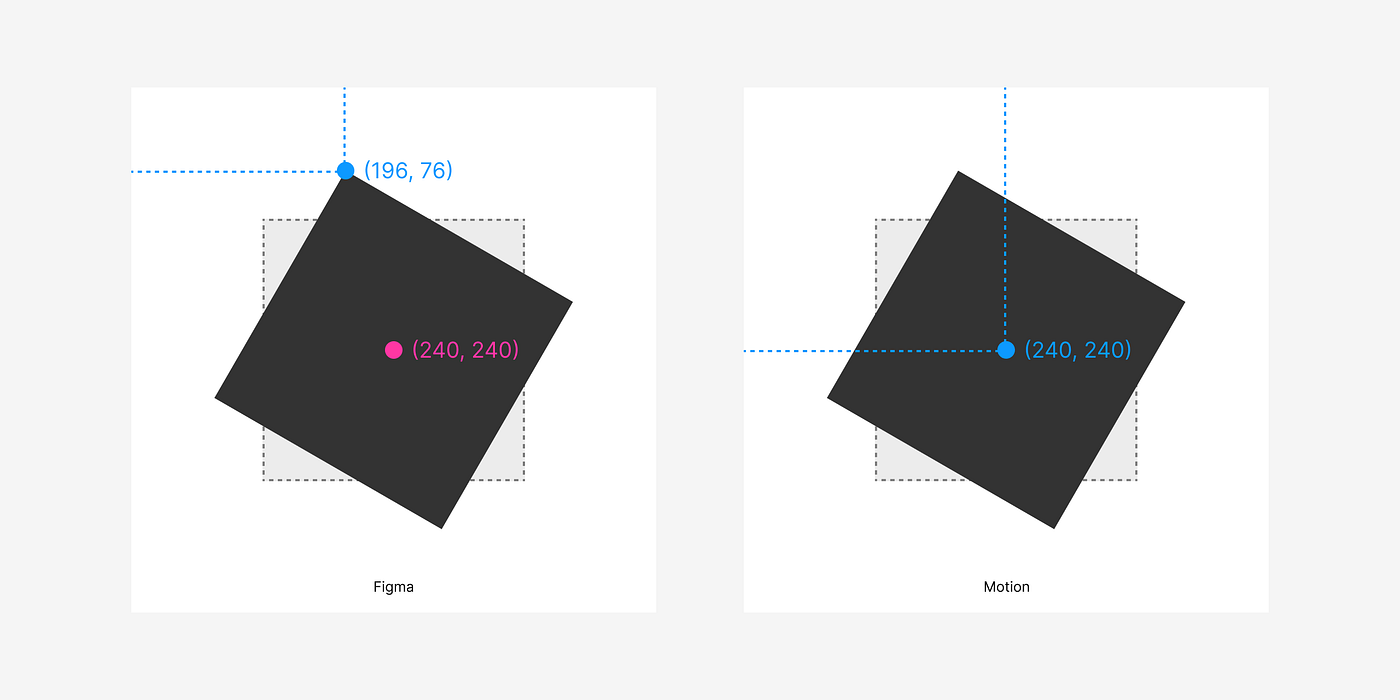
The default anchor point in Figma is the top left corner for moving and the center for rotating. You can check it on your own. Move the layer, and the X and Y will change. But when you rotate it, the X and Y will change too.
By default, the anchor point in Motion is the center for X, Y and Rotation. So, X and Y will not change while rotating. It is very useful for animation. It is the common way in all products.
If you do not change the anchor point for the layer, the X and Y values in Motion will differ from the Figma X and Y values.
It is highly recommended to set the proper anchor point before adding any keyframes for the X and Y properties.
First animation
Let’s animate.
Make a rectangle in a frame on the left side of it. Exact sizes and positions do not matter for now. Go to 0s time.

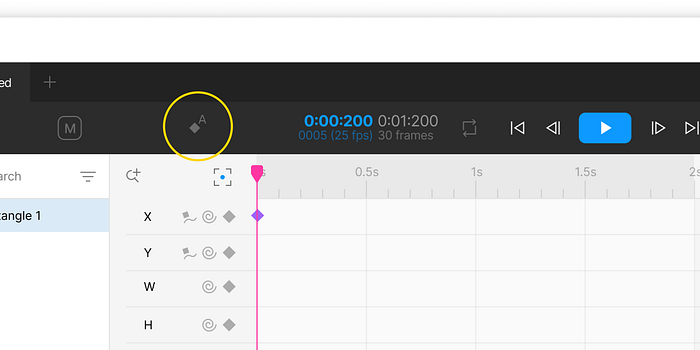
Click on the Add keyframe button for X, and the keyframe will be added to the current time position. Do the same for Rotation.

Go to 1s time. Move the rectangle to the right and rotate it. Add keyframes for X and Rotation.


Click on the Play button, and the rectangle will move and rotate.

It is an example of how to make a simple animation using keyframes. You can change any properties you want in the timeline in Motion.
Tip: Layers may have different available properties to animate. It depends on the layer type. Some layers cannot even be moved, e.g., layers inside Instances. Some layers may have additional properties, like Text for text layers.

Easing
Easing is a very important part of every animation. It describes how the property value will change over time: will the speed grow or slow down.

With the help of easing, you can make more natural animations. Almost all real-time object movements do not move linearly. Everything has a start speed,an end speed, and how it changes along the period.

Tip: Use non-linear easing in most of your animations. You can set a default easing in the Motion Main menu / Preferences.
Manipulating keyframes
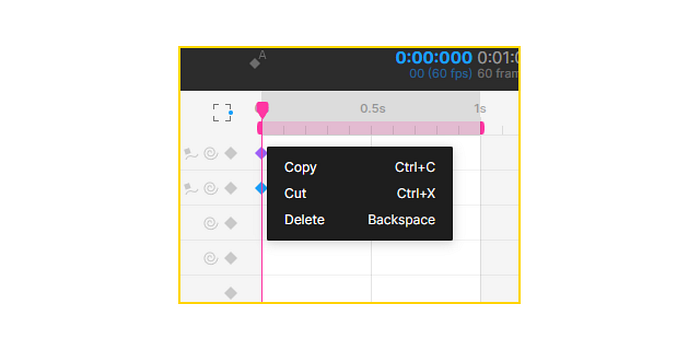
There are several simple actions on keyframes: Copy / Paste / Cut / Delete. They are very simple, and you can work with them from the dropdown menu on keyframes or using shortcuts Ctrl+C / Ctrl+V / Ctrl+X / Del respectively. Or, you can hold the Alt key while moving a keyframe in order to copy it.
You can copy keyframes (and paths/links/presets) among Figma files.
Motion pastes keyframes onto the current time position. Sometimes Motion can ask you to replace pasted keyframes.
Tip: If you copy X / Y keyframes from one layer to another and the target layer has another position, Motion will ask to recalculate keyframes according to the target layer position. It is very helpful when you animate several similar objects with the same animation but positioned differently.
You can move keyframes using the arrow keys. By default, keyframes are moving by several ms/frames. Hold the Shift key to move a larger distance at once.
Auto-update keyframes
After you add some keyframes, you can update your objects keyframes during the time right on the canvas or using the Figma properties panel. Just turn on this option, go to the time position you need, and change the object position / rotation, or any other property for those for which you already have keyframes. They will be automatically updated.
Time format
Time has several representations in Motion. The next values are equal: 1s, 1000ms, 1000, 1:000, 00:01:000.
Calculations
Any input field, like time or any value, supports math calculations like Figma does. You can learn more from this article.
That’s all?
Yes! It was basic knowledge of what the keyframe is. Keyframe is a simple tool that is very powerful. But we can dive into some animation techniques.
Here you will see some more examples of different techniques for keyframes usage. You can check all of them in the file https://www.figma.com/file/h3t0bkw0pP4JSJnArrmOvr/Motion-plugin-Keyframe-animation-examples?type=design&node-id=0-1&t=Eiuy4mjX9U9eI6go-0.
Different anchor point
Changing the anchor point may help you animate objects taht rotate away from its center.
Keep in mind to the set anchor point before adding any X and Y keyframes.

Moving along the arc
Your objects can move non-linearly with the help of easing. In this example, we changed the final Y keyframe easing from Linear to Ease out (Circ), and the circle path had changed!
Tip: If you want to move objects along your path check this article https://medium.com/@babkin-pavel/how-to-animate-objects-along-the-path-in-figma-motion-plugin-370f3bf95e7b.
Easing back
Some easings have Back postfix. Combining Ease in (Back) with Ease out (Back) can give you a very interesting effect.

Rotating with constant orientation
The star is moving around the circle, but it keeps its horizontal orientation. To make such an animation, you should have a frame helper. The frame should rotate in one direction, and the start should rotate in another, in order to compensate for the frame rotation.
Scaling
Sometimes it is convenient to animate not Width / Height, but Scale width / Scale height. Firstly, fix the Width / Height with keyframes. Then animate with scaling properties’ keyframes. They are named by W % and H % respectively.

Animating text
You can animate text like text or a counter. Set keyframe text type to Default, if you want to animate text letter by letter. Set keyframe text type to Counter, if you want to animate counters. By the way, you can use integer and float values for the counter.

Animating components
You can animate components and their instances. The star component and all its instances are animated separately.

Shape morphing
You can make a shape morph by animating the Shape property. Only flattened vectors are allowed. Keep in mind that keyframe shapes should have equal vector points.
There are two ways to do it. By changing the shape (Self type) and picking the shape from another layer (Another layer type).

Conclusion
Keyframe is a simple but very powerful tool. Now you know a lot about it.
Read this article to learn how to improve your animation with paths.
Try to make your own animations and share them on Twitter or Facebook with the #motion or #motionplugin hashtags.